This week, our class had gone through the laser cutting practical. During the practical, my group got to laser cut our sketches for the parametric contruction kit and we also went through the individual competency assessment . For our group, we made 2 different sketches for our kit. Figures 1, 2 and 3 shows the sketches that we made on Fusion360. It was inspired by "Lego" which Mr. Ting, our Lecturer-in-charge, had suggested, to make our ideation process easier. This was due to the fact that we can make different shapes using multiple "Lego" pieces.

Figure 1

Figure 2
Figure 3
Before I get to the activities my group did during the practical, lets take a look at the Improved Standard Operating Procedure(SOP) to follow when operating the laser cutter machine. It was improved because we felt that after going through the laser cutting practical, more can be added and improved in the initial Standard Operating Procedure that our group had crafted. Figure 4 shows the improved SOP.
SOP
Start- up porcedure:
1. Before commencing with the laser cutting process, identify all fire extinguishers within the venue.
2. Locate and turn on the air compressor(Red Switch at the side of the machine).
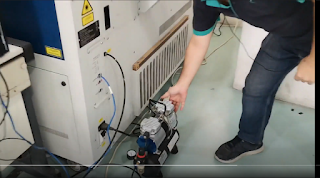
Figure 4
3. Locate and turn on the fume extractor (Green Switch behind the machine).
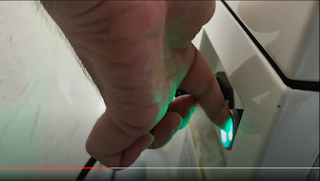
Figure 5
4. Switch on the laser cutter( Black ON-OFF switch at the corner of the machine).
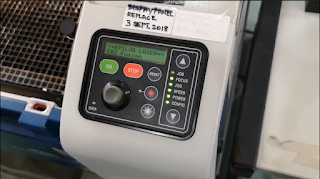
Figure 6
5. Wait for the laser cutter to complete initialization.
6. Once the laser cutter has been started up, proceed to the computer at the workstation to start setting the drawing to the laser cutter machine
Operation of the laser cutter including the basic use of Corel-Draw:
1. For Corel-Draw: Import the DXF file or SVG file of our construction kit to be laser-cut.
Figure 7
2. Set line weight, colour and fill depending on our needs.
Figure 8
(Red for Vector Cut, Green for Engrave and Engrave Etch/ Score)
(Hairline line weight for Vector cut and Engrave Etch/Score)
3. Put the choice of material to be cut inside the laser cutter.
4. Set the Operating Area to the area of our Material to be cut so that the laser cutter does not damage the internals of the machine by overshooting the material.
5. Send to print: File > Print (Ctrl-P), Press PRINT
Figure 8
6. Set Auto Focus to on (for Epilog M2 Machine) or Thickness (for Epilog Pro Machine).
7. Measure the thickness of the material and import the correct material setting from the library and set air assist to On (for Epilog M2 Machine). for both cutting and engraving
Figure 9
8. For Engraving, select the engrave tab and select the desired material
9. For Cutting, select the vector tab and select the desired material.
10. Press Print at the bottom right of the interface.
11. On the laser cutter machine, ensuyre that the file is correct and press the GREEN go button (Epilogue FUSION M2) or PLAY button (Epilogue Fusion PRO).
Figure 10
12. After the product has been laser cut, wait for 30 seconds to let the fume extractor remove the fume inside the laser cutter machine before removing the laser cut product.
13. Open the glass cover and use your fingers to knock the cut product out of the material
14. If the cut product does not cleanly fall off the sheet of material, slowly close the cover and do another round of cutting.
Shut-down Procedure:
1. Switch off the laser cutter (Black ON-OFF switch at the corner of the machine).
2. Switch off the fume extractor (Green Switch behind the machine)
3. Switch off the air compressor (Red Switch at the corner of the machine)
4. Perform housekeeping area around the laser cutter.
Unfortunately, our group did not manage to take a video of our laser cutting process as we were too indulged in the laser cutting. So sorry. Instead, here are the links to the videos that I watched that are very similar to what my group did during the practical:
The figures below shows the "TEST" product that I made during the indivcidual competency assesment and the parametric construction kit that my group had made. I felt accomplished because before the assessment, I felt very nervous as I was afraid that I might mess up the test. Fortunately, that did not happen.
Figure 12
Learning Reflection:
In this practical, I got to learn a new skill which is the laser cutting. I find that it is an essential that will definitely help me in producing a product as it can cut materials within seconds. During the practical, our group made a few mistakes such as trying to have a press-fit design when connecting our pieces together. This was when we remembered about kerf where it is the amount of material that is removed by the laser cutter machine. We also measured the thickness material wrongly which adds to why our pieces did not have a press-fit design. Also, my group did not know that we had to bring our own thumbdrive for importation of files into the laser cutter machine as we thought that it was bluetooth. Next time, I will be sure to bring my thumbdrive for laser cutting. That is all for this laser cutting practical. See you next time where we will learn more about Arduino Programming!


No comments:
Post a Comment